Showing posts with label android. Show all posts

Monday, 9 August 2010

Simpler alternative exploid ROOT method (X10Root.apk) for your Xperia Mini Pro

NOTE: I see no reason why this should not also work on the E10i (Xperia Mini)
I came across this method last week and tried it over the weekend.  I had success with this simple method, and used the app Terminal Emulator to test – I did get root # but was unable to delete peggle.apk from the system/app folder, I got the error “Permission Denied”.  I think I need to do a CHMOD command to change the permission to allow this to work.  When I get a chance to retest it I will report back and update this entry.
  1.  Download this APK and install it on your device by running it through a file manager. It would be a good idea to download this using the Browser on your device
  2. You might have to enable third-part-apps if you haven’t done it already
  3. After installation run the app and follow onscreen instructions
  4. I found tapping on the screen where the outputs are running reverses the ROOT (unroots) so avoid doing that, once it has finished press the HOME button
  5. Download Terminal Emulator from the Market (or another terminal app) and test it out!
Would be great to hear how you get on with this.

Wednesday, 4 August 2010

How To: Remove root / unroot your Xperia Mini Pro

Note: This restores original software to your phone, it is the repair method and can be used to fix numerous issues on your handset.

If you have rooted your Mini Pro and for some crazy reason want to undo the root here is the info you need... admit it, you deleted something you shouldn’t have! :)
  1. Disable USB Debugging mode (do the opposite of step 4-b here)
  2. On your computer, start-up Sony Ericsson PC Companion (download it here)
  3. When prompted connect the phone to the USB cable, if not prompted just plug it in about 30 seconds after starting SE PC Companion up.
    --It's your choice to update or cancel update if prompted, I advise cancelling the update until later
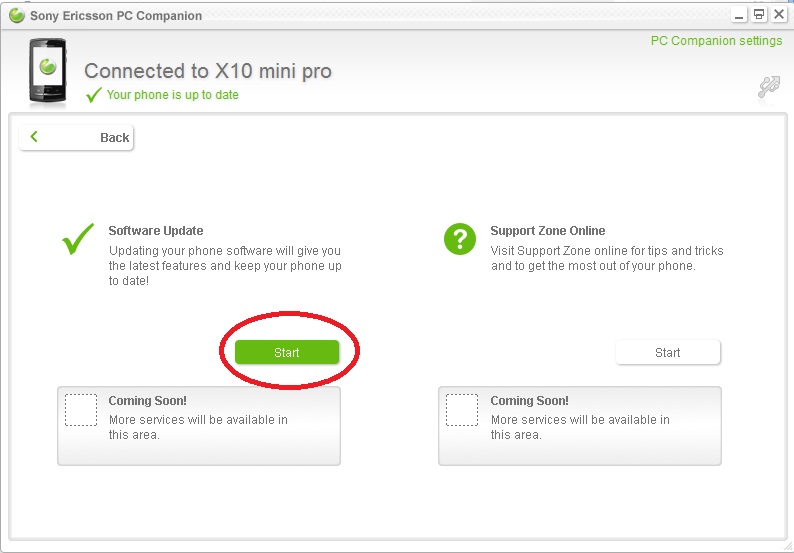
  4. On the main SE PC Companion screen, click on Start in the Support Zone box

  5. Under Software Update, click on Start
  6. Now click on Repair
  7. Following the instructions on screen to progress


Good luck with your repair / unroot

Monday, 2 August 2010

Full ROOT coming soon hopefully

The exploid method to ROOT your Xperia Mini Pro is fine for Android 1.6 but it will not allow flashing the ROM to change the bootloader i.e. to load Android 2.1 or 2.2 on to the device right now.  With the anticipated Android update coming from Sony Ericsson very soon, it is likely the exploid root will be patched.

On the XDA forums a user called Bin4ry is currently working on finding a method of properly rooting the device.  When it is announced as discovered I will provide coverage on my blog, but for the absolute latest breaking news get yourself registered on the XDA forum.

Currently there are no custom Android 2.1 and 2.2 ROMs for the Xperia Mini / Mini Pro, so that is another thing the community of owners are waiting for.

How To: ROOT your Mini / Mini Pro ANDROID 1.6 (Newbie-friendly guide) exploid method

UPDATE 3: If you are running Android 2.1 please see these instructions for root instead

UPDATE 2: Refer to this post for a SIMPLER root for your Android 1.6 Mini X10

UPDATE 1: I have cleaned up the instructions + formatting

First and foremost, full credit to exploid and source.

If you have struggled to follow the steps found elsewhere then I am writing up these altered version of the steps with you in mind, hopefully you can smoothly ROOT your Mini Pro now.

Please follow each step carefully. These steps are to be carried out on a Windows XP, 2000, Vista or 7 computer (32/64 bit).

Note:
You are advised to have about 50% charge on the battery minimum, ideally much higher if not fully charged.
  1. Download exploid_x10mini.zip
    a.    Extract the ZIP file contents to C:\exploid_x10mini
  2. Download the Android SDK here
    a.   Open up the downloaded file and browse inside it to android-sdk-windows\tools\ -- now extract the entire contents of this folder to C:\exploid_x10mini

    IMPORTANT: Make sure the files have extracted properly, sometimes you may accidently end up extracting them to C:\exploid_x10mini\android-sdk-windows\tools\ - if this happens go in to C:\exploid_x10mini\android-sdk-windows\tools\ and move the entire contents to C:\exploid_x10mini\
  3. Download the Sony Ericsson PC Companion – do NOT plug the USB cable to your Mini Pro when it prompts
  4. On your Xperia Mini you need to enable USB Debugging:
    a.   Go to Settings > Applications > Development
    b.   Tick to enable: USB Debugging
    c.   Tick to enable: Stay awake
  5. You need the Power Control Widget enabled on a home screen for a later step, doing this now is best:
    a.   On the Home Screen press the Menu button (left button)
    b.   Select on Arrange Widgets
    c.   Find and select Power Control
    d.   Press the Back button to return to the home screen, you should be on the page displaying the widget
    e.   On this widget do a quick test, touch the left icon for wifi to enable/disable it to make sure it is working
    f.   ALTERNATIVE: Download a WIFI on/off widget and use that instead for the later stepg.

    IMPORTANT:
    Leave the WIFI turned ON – doesn’t matter if you are connected to an AP or not
  6. Plug the USB cable between computer and the Mini Pro. Windows should show a driver installation notification but ignore the state of the Sony Ericsson PC Companion, leave it running in the background
  7. Click on START and type CMD and press Enter. Alternatively Press the FLAG button + R and type CMD and press Enter.
  8. At the CMD command line type in all the RED TEXT as displayed below, the text in white should be similar to what you see happening after you type the red text and press Enter.


    C:
    cd c:\exploid_x10mini
    C:\exploid_x10mini>adb push Superuser.apk /sdcard/Superuser.apk
    * daemon not running. starting it now *
    * daemon started successfully *
    315 KB/s (38823 bytes in 0.120s)
    C:\exploid_x10mini>adb push su /sdcard/su
    1080 KB/s (22120 bytes in 0.020s)
    C:\exploid_x10mini>adb push exploid /sqlite_stmt_journals/exploid
    1049 KB/s (9672 bytes in 0.009s)
    C:\exploid_x10mini>adb push busybox /sqlite_stmt_journals/busybox
    1901 KB/s (1709832 bytes in 0.878s)
    C:\exploid_x10mini>adb shell
    $
    cd sqlite_stmt_journals
    cd sqlite_stmt_journals
    $
    chmod 755 exploid
    chmod 755 exploid
    $
    chmod 755 busybox
    chmod 755 busybox

    IMPORTANT: Immediately after the next command, you will need to disable and enable the wi-fi using the power control widget (from step 5) on the phone

    $ ./exploid
    ./exploid
    [*] Android local root exploid (C) The Android Exploid Crew
    [*] Modified by birdman for the DroidX
    [+] Using basedir=/sqlite_stmt_journals, path=/sqlite_stmt_journals/exploid
    [+] opening NETLINK_KOBJECT_UEVENT socket
    [+] sending add message ...
    [*] Try to invoke hotplug now, clicking at the wireless
    [*] settings, plugin USB key etc.
    [*] You succeeded if you find /system/bin/rootshell.
    [*] GUI might hang/restart meanwhile so be patient.


    Now turn Wifi OFF and back ON
  9. Now type in rootshell and press Enter
    a.   Enter this password rootnowb.   The prompt will change to # … you now have ROOT!
  10. Type the following commands, pressing Enter on the keyboard after each line:
    ./busybox cp /sdcard/Superuser.apk /system/app/
    ./busybox cp /sdcard/su /system/bin/
    ./busybox cp busybox /system/bin/
    chmod 4755 /system/bin/su
    rm /system/bin/rootshell
  11. Type exit – this will exit out of rootshell
  12. Type exit again – this will exit out of adb shell

    Your device is now rooted but lets verify this now:
  13. Type in adb shell and press Enter
  14. Type in su and press Enter – look at your Xperia Mini Pro screen – Superuser.apk should run on the phone and will ask whether to allow the root permission.Feel free to leave questions in comments if you get stuck or do not understand any of the steps.

Easy method to ROOT your Xperia Mini and Mini Pro

Head on over to this link:

http://android.doshaska.net/x10miniroot

Full credit to Exploid - brilliant work. I have seen many people struggling to follow these steps successfully on various forums and comments sections -- I will post an altered version of the steps found on the above URL.

Thursday, 22 July 2010

HelixLauncher Donut - Alternative user interface for your Xperia X10 Mini Pro

Watch this video (not my video!) if you want to try this user interface on your Xperia Mini Pro the steps are below. I have been using this since I bought my Mini Pro and love it, it is much better than the default Home launcher UI and there are a lot of reports on forums and blogs that it improves battery life. I get over 48 hours off a full charge so perhaps HelixLauncher is to thank for that.


This will not delete the current Sony Ericsson Home UI, it basically works "instead" of it if you install it (and when prompted if you set it as your default) -- you can safely uninstall it if you do not like it.
  1. Make sure you can install 3rd party applications on your device
  2. Do you have a file manager already installed? I recommend ES File Explorer, available from the Market
  3. Download HelixLauncher Donut, browse to the download location and run the APK file using a file manager

Friday, 9 July 2010

How To: Install Skype on your Xperia Mini or other Android phone

UPDATE: Skype has been officially released, you can get the APK here.

UPDATE 02 AUGUST 2010:
Bad news, it looks like the versions of Skype available on the repos right now only allow audio calls by dialling a local number. I have uploaded Skype (BETA) v1.0.0.5 here.


In the UK and USA Skype has some special agreement with specific networks, in the UK it's locked to the Three network. This means unless you are with Three you cannot download/run Skype – browsing to http://skype.com/m does not currently allow you to download Skype if your on a different network.
This is how to install a working version of Skype on any Android phone:
1. You need to firstly enable third-party apps on your phone
2. You need to install and run APKtor on your device, use the mentioned repos
3. Search for Skype – install it
I am on Vodafone in the UK and I have tested this briefly on my Xperia Mini Pro – the app seems slightly buggy at times but the majority of main features are there (IM, audio call, contact lists, profile editing) – looks and feels a bit like the Symbian S60 version. My test call worked brilliant. Worked using wifi, Edge and 3G.

How To: Find and install third-party apps on Android / APKtor alternative to Market

NOTE: This how-to may enable you to download paid/cracked apps, for which I take no responsibility or liability - do at your own risk.

First, you need to download APKtor, which is available on the Market. You can also download it from http://apktor.gotoinit.com/download/ either using the browser on your phone or from a computer, then transferring the APK file (APKs are Android app installation files) to your device and running it using a file manager (I recommend ES File Explorer grab it here if your Market is not working).

After installation, start up APKtor. You will be notified that no repositories are setup yet. Repositories (aka repo's) are URLs pointing to app collections. Once you add some repos you can directly download and install apps from APKtor. The best way to find repos is to Google around for them.

Here are three repo's that I found in a search:
- http://repo.blackdroid.net
- http://android-es.com/repo/apk/
- http://aptoide.com/rep

After adding some repo's APKtor should automatically populate a huge list of apps. You can force an update by pressing the Menu/Options button (left button under screen) then touching Update. Simply touch an app and then touch install. You can uninstall apps the usual way and also by going to the "Installed" page within APKtor, touching an app and touching uninstall.

Have fun!

How To: Enable third-party apps on your Android 1.6 phone

If you enable this feature you can download apps from “unknown sources” such as websites, other Market apps or transfer them between Android phones and be able to install them.

There is a bit of a risk because some of these apps are not Google Market “approved” so if you don’t know what an app does or who it is made by, there is a risk. Use your best judgement rather than impulse downloads and installations – Google check reviews on apps beforehand.

How to enable third-party app installation on your Android phone:
1. Go to Settings
2. Touch Applications
3. Touch Unknown Sources (so the tick is white) – this enables the feature

NOTE: This method is for Android 1.6 but may be the same/similar on newer Android versions.

Thursday, 8 July 2010

Xperia Mini Pro - My likes and dislikes

Check out this page for a list of my likes and dislikes. I will be updating this frequently until I feel it is complete.

http://xperiaminipro.blogspot.com/p/likes-and-dislikes-xperia-mini-pro.html

How To: Hide folders from Album gallery thumbnail cache in Android 1.6

NOTE: Be careful, if there is a folder you do not want Album to see and generate a thumbnail cache of, you must not open Album before doing these steps.

1. Go to the Market and download AndExplorer, open it and find the folder you want to hide
2. Long-touch on the folder you want to hide - a green tick should appear beside it
3. Press the Menu/Options button at the bottom of the phone (left button below screen)
4. Touch Rename
5. Add a dot to the beginning of the folder name, e.g. if there is a folder called NewFolder rename it to: .NewFolder

Done. Android treats folders starting with a dot as hidden folders, the Album app will not scan the contents of such folders.

By the way, AndExplorer is my personal choice for a file manager app – there are other good ones available too, Astro for example.

Gmail sync advice - should you use your main Gmail account?

I recommend you create a new Gmail account for use with your Android phone. This is because if you, like me, have had a Gmail account for some years you probably have lots of email-only contacts automatically created when replying to emails – mostly people/companies you may never contact again. Also you probably do not have phone numbers stored for your Gmail contacts. Do you really want all this clogging up your device?

Top reasons why to create a new Gmail account:
• Selected emails/senders from your primary Gmail account can easily be setup to forward to your new Gmail account
• You can export contacts from your old phone in to a fresh, clean, empty Contacts list in a new Gmail account – these will then sync to your phone when you add your new account
• Less data traffic going to your handset = battery power saved
• If your phone is lost/stolen your primary email account is not at risk of being compromised

Although, to be fair here are some reasons why to use your EXISTING Gmail account:
• If everything is setup neat and tidy, your Contacts list is clean and has phone numbers
• You have properly setup password recovery (ideally using a phone number other than the phone you are syncing to – because what happens if it gets stolen!)
• You need your existing Gtalk / Gmail chat contacts